
UniMaxV5 系列开发培训 - 单表开发
背景
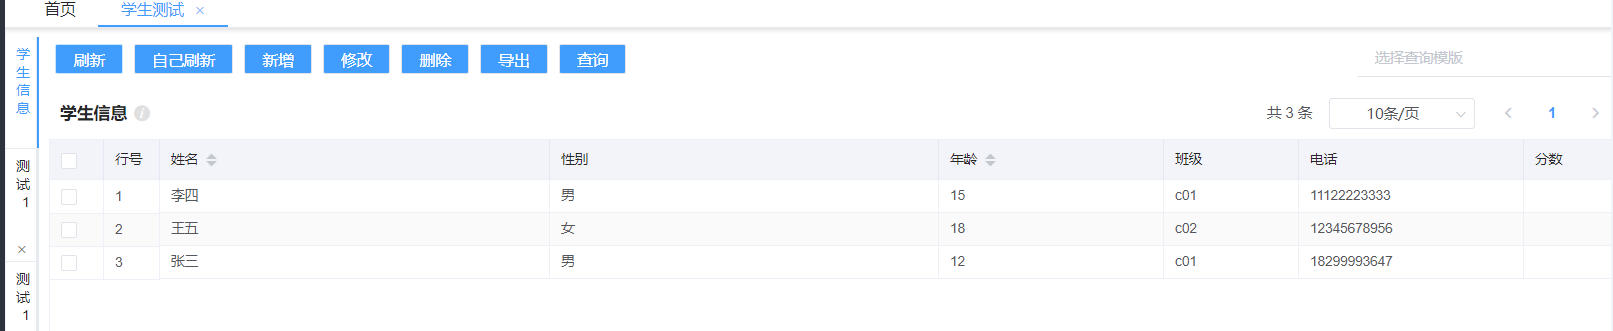
本期视频讲解的是怎么去开发单表的流程。以学生表为例,其中学生表字段为姓名(name)、性别 (sex)、年龄 (age)、班级 (className)、电话 (phone)。性别是一个选择框(0,1 分别代表男和女),其余全是文本框;在表格里面多了一个分数(score)属性,它是学生表里面没有的字段,用来去突出pass:true的作用。在表格 grid 数据的展示是和实体息息相关,通过实体字段一 一映射,如果实体里没有这个字段是会报错,所以需要使用 pass 去忽略次字段。在 form 表单里面对姓名这个字段做了个远程校验姓名不能为空的判断。只有满足校验结果才能去请求后台。
开发流程
1、首先在目录下创建自己的 vue 文件

2、在菜单定义里面去添加次页面,url 路径就是你创建文件的路径。
注意:路径从一级菜单开始,后面的“ .vue”,不需要,斜杆是“/”。
例子:我的 student.vue 文件在 系统管理 / 菜单设置下。所以我的路径就是 umasysmanage/menuSettings/student
3、角色管理添加权限
4、开始写 student.vue 页面
注意:你在里面添加的变量必须要在 data()里面的 return 里面定义,否则报错。添加的事件必须在 methods:{} 里面定义(样例如下)
样式模板
<template>
<eh-layout>
<div slot="center">
<div slot="center">
</div>
</div>
</eh-layout>
</template>
<script>
import qs from "qs";
export default {
name: "student",
data() {
return {
};
},
created() {
},
mounted() {},
methods: {
// 方法名称 展示样例, 在<template>里面定义的方法在methods里面必须有,但在methods里面的有的不一定要在<template>里面写
getMenthod(){},
},
};
</script>
<style lang="scss" scoped>
</style>
注意 : name 属性的值必须和你的页面名字一样。
5、添加 eh-tabs 插件(用法如 EhTabs 平台多标签页组件)
必须
-
:tabs.sync="tabs" 是添加要显示的标签页,
-
v-model=“tabsName” 是默认选择的标签页
-
@after-close=“close” 标签页关闭事件
注意:
- ref 在大多数情况你是必须加的,除非你不需要去自动关闭标签页。如果你一开始标签页只有学生信息这个标签页,你可以这样定义 tabs
tabs: [{ name: "student-select", title: "学生信息" }],
- tabs 里面对象的 name 的值 必须和你slot的值对应
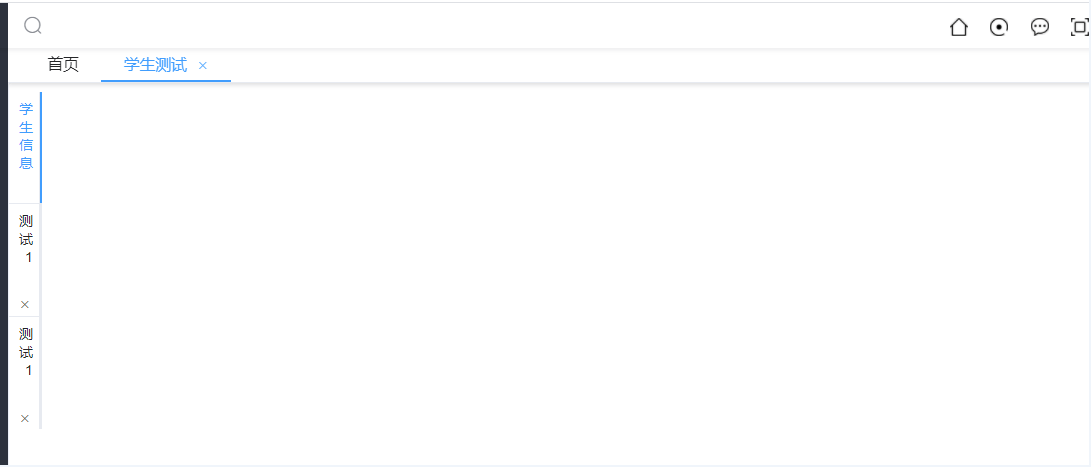
本次示例是显示三个标签页,默认选中学生信息标签页
<template>
 <eh-layout>
 <div slot="center">

 <eh-tabs :tabs.sync="tabs" ref="myTabs" v-model="tabsName" @after-close="close">
 <template slot="student-select">

 </template>
 </eh-tabs>

 </div>
 </eh-layout>
</template>
<script>
import qs from "qs";
export default {
 name: "student",
 data() {

 return {
 tabsName : "student-select",
 tabs: [
 { name: "student-select", title: "学生信息" },
 { name: "student-cess1", title: "测试1" },
 { name: "student-cess2", title: "测试1" }
 ],
 otherParam : {},
 };
 },
};
</script>
图形展示
添加 eh-grid 表格(用法如 Eh-Grid 表格组件)
有五个必填属性
-
id :关联了查询模板
-
ref: 用来拿取表格数据
-
grid :表格展示相关的属性配置
-
dataSource : 表格数据获取相关的属性配置
-
options:表格的其他的一些属性配置
注意:
-
如果表格想添加按钮你可以使用去添加。在这个里面去添加自己想要的按钮。
-
对于添加的按钮 class=“changeButton” 是必须添加的,对于除了 eh-grid 里面的按钮 你还需要在外面的 div 上添加class=“item-button”
-
对于 刷新、导出、查询按钮是不需要自己定义的,插件已经自定义好。但对于刷新的事件你自己还是需要写的,对于一些特别的比如加上了 **“row-key”: “id”属性的你还需要去使用clearSelection()** 方法,如果想要去隐藏这三个按钮,可以去看下面文档。
-
对于 导出 有抛出一个方法,你可以通过ref直接去调用它
相关示例如下:
<template>
<eh-layout>
<div slot="center">
<div slot="center">
<eh-tabs :tabs.sync="tabs" ref="myTabs" v-model="tabsName" @after-close="close">
<template slot="student-select">
<eh-layout>
<div slot="center">
<eh-grid
:grid="gridOptions.grid"
id="student"
ref="student"
:dataSource="gridOptions.dataSource"
:options="gridOptions.options"
@selection-change="handleSelectionChange"
@cell-click="cellclick"
>
<template slot="toolbar">
<el-button class="changeButton" @click="refresh">自己刷新</el-button>
<el-button class="changeButton" @click="addOrEdit('add')">新增</el-button>
<el-button class="changeButton" @click="addOrEdit('edit')">修改</el-button>
<el-button class="changeButton" @click="del(rwoData)">删除</el-button>
<!-- <el-button class="changeButton" @click="exportExcel">导出</el-button> -->
</template>
</eh-grid>
</div>
</eh-layout>
</template>
<template slot="student-cess1">
</template>
<template slot="student-cess2">
</template>
</eh-tabs>
</div>
</div>
</eh-layout>
</template>
<script>
import qs from "qs";
const gridOptions = {
dataSource: {
bean: "studentController",
method: "select",
entity: "com.epichust.entity.Student",
filters: [
{
field: "name",
compare: "eq,cn",
data: "",
type: "text",
},
{
field: "sex",
compare: "eq,ne",
data: "",
type: "select",
options : {
keyName : "label",
valueName : "value",
selectOptions :[
{label : '男', value : "0"},
{label : '女', value : "1"},
]
}
},
],
},
grid: {
// sortButton: true,
title: "学生信息",
description: "这里可以填写一些学生信息的描述",
stripe: true,
border: true,
selectMax: 1,// 单选
export: true,// 导出
// refreshBtn: false,
"row-key": "id", //
// sortButton: true,//手动上下排序按钮
manualSort:true,//拖拽表格行排序
columns: [
{
prop: "id",
label: "id",
visible: false,
exportHideen : true, // 导出隐藏
width : "120px",
},
{
label: "姓名",
prop: "name",
// width : "120px",
sortable: true
},
{
label: "性别",
prop: "sex",
// width : "120px",
formatter : (row,cel) => {
return row.sex == 0 ? '男' : "女"
}
},
{
prop: "age",
label: "年龄",
width: "200px",
sortable : true
},
{
label: "班级",
prop: "className",
width : "120px",
},
{
prop: "phone",
label: "电话",
width: "200px",
},
{
prop: "score",
label: "分数",
width: "200px",
pass : true
},
],
defaultSort: {
prop: "name",
order: "ascending"
},
pagination: {
pageSize: 10,
},
},
options: {
// 是否显示编辑过滤
// showFilterTemplate: false,
// usetotal: false,//带总量查询
extraParamFields: {
// consition: '8a5aya54a5t4t43453thf4'
},
},
};
export default {
name: "student",
components: { studentAddOrEdit },
data() {
return {
tabsName : "student-select",
gridOptions: gridOptions,
rwoData: [],
tabs: [
{ name: "student-select", title: "学生信息" },
{ name: "student-cess1", title: "测试1" },
{ name: "student-cess2", title: "测试1" }
],
otherParam : {},
};
},
};
</script>
相关图形展示
6、添加事件和表单文件的引入
注意:
-
事件与事件之间以 **“,”分割,不然报错。而且必须写在methods里面,对于有特定需求的方法,例如想页面一开始就加载的方法,你可以写在mounted** 里面
-
对于想要获取表格的所有数据,这里提供了两种方法:
-
通过ref 去获取:this.$refs.ref 的名字.data
-
通过dataSource获取: this.gridOptions.dataSource
提示:建议通过第一种方式获取,第二种方式获取数据是有限制的,它的 dataSource 必须是”数组“形式的,而且它不是双向绑定的,如果对表格的值有修改,它将不会是最新数据,所以特别注意,一定要通过 ref 去拿值。
-
新增和修改:
本次案例使用的是插件的形式,也可以直接在页面内去定义二个新增或修改,然后在里面写上 form 表单。
这里主要讲解插件形式的。如果你想让新增或修改可重复利用,你可以去把他们写在一个页面里面,然后在主页面里面去引入。
使用方式:
-
-
1、引入表单的 vue 文件。案列的表单文件在同级别所以是 import studentAddOrEdit[1] from “./studentAddOrEdit”;
-
2、组件注册。**components: {studentAddOrEdit}这里的 studentAddOrEdit 和你上面引入“[1]”** 的名字是一样的.
-
3、使用
-
参数的传递:
如果是使用的插件的形式,就将面临一个问题,我改如何去传递我想要参数到表单的页面呢。你可以去 data 里面去声明一个变量(otherParam),然后 ====,最后在你要去打开这个页面的位置去给这个变量赋值,推荐使用对象形式。==赋值的时候要注意这个值是不是你想要的值,是否多次打开会混淆,所以希望你先置空==. 关于为什么这里要给 ==param==,请看 == 表单文件 == 这个章节。
特别说明:为什么下方的新增 / 修改写了 slot 这个属性,因为要把新增修改放入到 tabs 标签页中,如果你不写,到时候页面会加载不出来。如果你只是想简单的引入,不是放在 tabs 下面,你可以不用写 slot。
<template>
<eh-layout>
<div slot="center">
<div slot="center">
<eh-tabs :tabs.sync="tabs" ref="myTabs" v-model="tabsName" @after-close="close">
<template slot="student-select">
<eh-layout>
<div slot="center">
<eh-grid
:grid="gridOptions.grid"
id="student"
ref="student"
:dataSource="gridOptions.dataSource"
:options="gridOptions.options"
@selection-change="handleSelectionChange"
@cell-click="cellclick"
>
<template slot="toolbar">
<el-button class="changeButton" @click="refresh">自己刷新</el-button>
<el-button class="changeButton" @click="addOrEdit('add')">新增</el-button>
<el-button class="changeButton" @click="addOrEdit('edit')">修改</el-button>
<el-button class="changeButton" @click="del(rwoData)">删除</el-button>
<!-- <el-button class="changeButton" @click="exportExcel">导出</el-button> -->
</template>
</eh-grid>
</div>
</eh-layout>
</template>
<template slot="student-cess1">
</template>
<template slot="student-cess2">
</template>
<!-- 新增/修改 -->
<studentAddOrEdit slot="student-add" :param="otherParam" @tabmoved="remove"></studentAddOrEdit>
<studentAddOrEdit slot="student-edit" :param="otherParam" @tabmoved="remove"></studentAddOrEdit>
</eh-tabs>
</div>
</div>
</eh-layout>
</template>
<script>
import qs from "qs";
import { getFormDataByObject } from "@/util/index.js";
import studentAddOrEdit from "./studentAddOrEdit";
const gridOptions = {
dataSource: {
bean: "studentController",
method: "select",
entity: "com.epichust.entity.Student",
filters: [
{
field: "name",
compare: "eq,cn",
data: "",
type: "text",
},
{
field: "sex",
compare: "eq,ne",
data: "",
type: "select",
options : {
keyName : "label",
valueName : "value",
selectOptions :[
{label : '男', value : "0"},
{label : '女', value : "1"},
]
}
},
],
},
grid: {
// sortButton: true,
title: "学生信息",
description: "这里可以填写一些学生信息的描述",
stripe: true,
border: true,
selectMax: 1,// 单选
export: true,// 导出
// refreshBtn: false,
"row-key": "id", //
// sortButton: true,//手动上下排序按钮
manualSort:true,//拖拽表格行排序
columns: [
{
prop: "id",
label: "id",
visible: false,
exportHideen : true, // 导出隐藏
width : "120px",
},
{
label: "姓名",
prop: "name",
// width : "120px",
sortable: true // 排序
},
{
label: "性别",
prop: "sex",
// width : "120px",
formatter : (row,cel) => {
return row.sex == 0 ? '男' : "女"
}
},
{
prop: "age",
label: "年龄",
width: "200px",
sortable : true
},
{
label: "班级",
prop: "className",
width : "120px",
},
{
prop: "phone",
label: "电话",
width: "200px",
},
{
prop: "score",
label: "分数",
width: "200px",
pass : true
},
],
// 默认排序
defaultSort: {
prop: "name",
order: "ascending"
},
pagination: {
pageSize: 10, //页面大小
},
},
options: {
// 是否显示编辑过滤
// showFilterTemplate: false,
// usetotal: false,//带总量查询
extraParamFields: {
// consition: '8a5aya54a5t4t43453thf4' //额外参数
},
},
};
export default {
name: "student",
components: { studentAddOrEdit },
data() {
return {
tabsName : "student-select",
gridOptions: gridOptions,
rwoData: [],
tabs: [
{ name: "student-select", title: "学生信息" },
{ name: "student-cess1", title: "测试1" },
{ name: "student-cess2", title: "测试1" }
],
otherParam : {},
};
},
created() {
},
mounted() {},
methods: {
//选择某一行数据
handleSelectionChange(val) {
console.info(val)
this.rwoData = val;
//获取表格数据 1 建议使用1这种方式。
console.info(this.$refs.student.data)
//获取表格数据 2
// this.gridOptions.dataSource
},
cellclick(row, column, cell, event){
},
// 关闭 tabs标签
close(name){
// this.refresh()
console.info(name)
},
remove(name){
if(name == this.tabsName){
this.$refs.myTabs.removeTab(name)
//对于有需要添加/修改保存完之后需要添加主页标签的,可以去添加this.tabsName = 'student-select'
this.tabsName = 'student-select'
}
},
//刷新表格
refresh() {
//刷新数据
this.$refs.student.bindGrid();
//添加了row-key 在需要加clearSelection()方法
this.$refs.student.clearSelection()
},
// 跳转新增修改
addOrEdit(val) {
// let data;
if (val == "add") {
this.otherParam = {}
this.tabs.push({ name: "student-add", title: "新增" });
}else{
if(this.rwoData.length != 1){
this.$message({
message: "请选择一行数据进行修改!",
type: "error",
});
return false;
}
this.otherParam = this.rwoData[0]
this.tabs.push({ name: "student-edit", title: "修改" });
}
},
exportExcel(){
this.$refs.student.openExport();
},
},
};
</script>
<style lang="scss" scoped>
</style>
7、表单文件
特别注意:关于表单文件,对于 == 显示 == 的文本框大于 ==6== 个的,请使用页面方式,如果小于等于 6 个,请使用弹框。参照用户管理界面的 == 新增和修改 ==
1、整个表单文件全部都是表单组件组成,里面包含一些属性希望不要忘记加上。
-
model
-
rules 验证规则
-
class=“form-container form-inline” 样式
-
label-position=“top” 标签位置
-
:inline=“true”
-
ref 关系到后面保存验证规则
2、因为是要当作插件使用的,所以需要接受组件传来的值,所以定义了props: [“param”], 相当与 data 里面的定义的一样,是本页面内全局并且页面加载的时候就存在。
注意:
-
按钮上 div 的 class=“item-button” 不能省略,请都带上,否则按钮与其它页面会不起,导致有落差感。
-
关于验证规则: 你可以使用 elementUI 本来就有的规则,也可以自己去定义。这里使用的是自定义的规则去请求了后台
-
而且特别注意一点的是使用了验证规则,你的 prop 属性的值不能省略,不然验证规则不会生效,也不能写错,和你的属性对应。
-
关于重置,虽然 elementUI 提供了重置事件,但是本人建议不要轻易使用,自己去写重置,可以像我下面那样写。它的重置非常不方便,而且会出很严重问题。慎用!!!
-
关于保存按钮,或者你不想让一个按钮被连续点多次,请在 上加上指令 v-throttle,默认一秒钟
样例代码
<template>
<el-form
:model="formData"
:rules="formDataRules"
ref="formDataForm"
class="form-container form-inline"
label-position="top"
:inline="true"
>
<div class="item-button">
<el-button class="changeButton" v-throttle @click="save('formDataForm')">保存</el-button>
<el-button class="changeButton" @click="resetForm('formDataForm')">重置</el-button>
</div>
<el-form-item prop="mode" label="mode" hidden>
<el-input v-model="formData.mode"></el-input>
</el-form-item>
<el-form-item prop="id" label="id" hidden>
<el-input v-model="formData.id"></el-input>
</el-form-item>
<el-form-item prop="createId" label="创建人" hidden>
<el-input v-model="formData.createId"></el-input>
</el-form-item>
<el-form-item prop="createDate" label="创建时间" hidden>
<el-input v-model="formData.createDate"></el-input>
</el-form-item>
<el-form-item prop="isActive" label="是否激活" hidden>
<el-input v-model="formData.isActive"></el-input>
</el-form-item>
<el-form-item prop="isDelete" label="是否删除" hidden>
<el-input v-model="formData.isDelete"></el-input>
</el-form-item>
<el-form-item prop="name" label="姓名" class="is-required">
<el-input v-model="formData.name"></el-input>
</el-form-item>
<el-form-item prop="sex" label="性别" >
<!-- <el-input v-model="formData.sex"></el-input> -->
<el-select v-model="formData.sex" placeholder="--请选择--">
<el-option
v-for="item in sexList"
:key="item.key"
:label="item.value"
:value="item.key"
></el-option>
</el-select>
</el-form-item>
<el-form-item prop="age" label="年龄" >
<el-input v-model="formData.age"></el-input>
</el-form-item>
<el-form-item prop="className" label="班级" >
<el-input v-model="formData.className"></el-input>
</el-form-item>
<el-form-item prop="phone" label="电话">
<el-input v-model="formData.phone"></el-input>
</el-form-item>
</el-form>
</template>
<script>
import qs from "qs";
import { formatTree } from "@/util/index.js";
export default {
name: "studentAddOrEdit",
props: ["param"],
data() {
let self = this;
let checkCode = (rule, value, callback) => {
{
let resultPromise = self.getCodeResult(value);
resultPromise.then((res) => {
if (res.type === "error") {
callback(new Error(res.data));
} else {
callback();
}
});
}
};
return {
formDefaultData: {
id: "",
createId: "",
createDate: "",
isActive: "0",
isDelete: "0",
name: "",
sex : "",
age : "",
className : "",
phone: "",
},
//form 表单
formData: {
id: "",
createId: "",
createDate: "",
isActive: "0",
isDelete: "0",
name: "",
sex : "",
age : "",
className : "",
phone: "",
},
formDataRules: {
name: [{ validator: checkCode, trigger: "blur" }],
},
sexList: [{key : '0', value : "男"},{key : '1', value : "女"}],
mode : ""
};
},
created() {
// console.info("id", this.param);
},
mounted() {
let self = this;
//赋值
let formData = self.formData;
for (var key in formData) {
formData[key] = this.param[key];
}
if(this.param.id){
this.mode = 'edit'
}else{
this.mode = 'add'
}
//重置
this.formDefaultData = Object.assign({}, this.formData);
this.resetForm('formDataForm')
},
methods: {
//保存
save(formName) {
let self = this;
self.$refs[formName].validate((valid) => {
if (valid) {
let formData = Object.assign({}, self.formData);
//去除空的值
for (var key in formData) {
if (formData[key] === "" || formData[key] == null) {
delete formData[key];
} else {
formData[key] = formData[key].toString();
}
}
let param = {
form: JSON.stringify(formData),
};
//请求
self.$http.post("studentController!saveform.m", qs.stringify(param)).then((res) => {
if (res.code != 500) {
this.$message({
message: res.data,
type: res.type,
});
if (res.type == "success") {
//关闭 tabs
self.$emit("tabmoved", "student-" + self.mode);
}
}
});
} else {
this.$message({
message: "请完善数据",
type: "error",
});
return false;
}
});
},
//重置
resetForm(formName) {
let self = this;
this.$nextTick(() => {
self.formData = Object.assign({}, this.formDefaultData);
self.$refs[formName].clearValidate();
});
},
// code 校验
async getCodeResult(value) {
let self = this;
let data = qs.stringify({
id: this.formData.id,
name: value,
});
let res = await self.$http.post("studentController!getCode.m", data);
return res;
},
},
};
</script>
样例展示

后台返回数据格式
1、统一以Map 集合形式返回。
2、对于提示消息,返回两个属性,data(提示的信息) 和 type(类型:消息的类型)
3、对于返回的实体并且复杂的,请使用 **FastJsonUtil.format(object)** 转一下。
提示:前端对后台的消息或者异常提示做过处理,例如 this.returnData.toSuccess(“保存成功!”);,前端可以直接获取到,不需要自己去以 Map 返回。
姓名的一个不为空验证,返回示例
public void getCode() {
Map<String,Object> map = new HashMap<>();
String id = this.getPageData().getParams().get("id");
String name = this.getPageData().getParams().get("name");
if((name!= "" && name != null)) {
map.put("data", "可以使用");
map.put("type", "success");
}else {
map.put("data", "名字不能为空");
map.put("type", "error");
}
this.returnData.toParam(map);
}
平台组件
EhTabs 平台多标签页组件
属性
- v-model 当前 tab 标签的 name。通过赋值可切换标签显示页。
事件
- after-close (Function) 在每次关闭标签页后 调用这个传入方法。默认参数 tabName:当前关闭的标签名。
方法
- removeTab 调用此方法会直接移除一个标签和它的内容,并修改传入的 tabs 属性值。
Eh-Grid 表格组件
注意 :id 必须
属性
dataSource (Object | Array 必填)
表格数据获取相关的属性配置
注意:如果需要查询模板,就需要添加 filters 属性,不然到时候查询模板查询字段会是空
 dataSource: {
 // formdata参数:控制器名 (string 必填)
 bean: "mbbBdMrlController",
 // formdata参数:方法名 (string 必填)
 method: "select",
 // formdata参数:entity (string 必填)
 entity: "com.epichust.entity.MbbBdMrl",
 // 使用此方法代替bean与method作为请求方法(string 可选)
 params: { id : 123 },
 // 配置过滤选项 (Array<Object>)
 filters: [
 {
 field: "id", // 字段名
 compare: "cn,ge", // 比较方式(多个以逗号分隔)
 data: "", // 值
 //type: "text"  // 输入框类型(暂时忽略)
 },
 {
 field: "code",
 compare: "cn,eq",
 data: "",
 }
 ],
 // 是否首次自动加载数据
 loadDataOnFirst: true,
 }
grid (Object 必填)
表格展示相关的属性配置
-
单选 selectMax: 1
-
导出 export: true
-
刷新 refreshBtn: false
-
手动上下排序按钮 sortButton: true
-
手动拖拽表格行 进行排序 manualSort:true
-
扩展表格和上移下移 需要使用到此属性 "row-key": “id”
-
隐藏列 visible: false
-
忽略此列 pass : true
-
排序 sortable : true
-
格式转换 formatter
-
导出时隐藏字段 exportHideen : true
注意:
-
columns 对象的 width 属性必须给。不然会出现样式不齐问题
-
配置了拖拽和上下排序功能需要添加 "row-key": “id”
-
添加了 "row-key": "id" 之后的表格刷新,需要使用到 clearSelection 方法
options (Object 非必填)
表格的其他的一些属性配置
 options: {
          // 是否显示编辑过滤
          showFilterTemplate: true,
          // 表格请求formdata参数 带总量查询
          usetotal: true,
          // 额外参数字段:其中的属性会带入请求方法的 formdata中。
          // 重要:如果要使用这个功能,需事先把 extraParamFields 定义好,哪怕是个空对象 {}
          extraParamFields: {
              // consition: '8a5aya54a5t4t43453thf4'
          }
        }
注意:
-
usetotal:true 或 false 有很大的区别,当为 false 时,不管你有多少条数据,当你的页面数为 10 的时候就只会查询 10 条数据
-
extraParamFields:如果需要传额外参数,就需要定义好,哪怕是个空对象 {}
事件
-
selection-change (Function) 获取 当前选择行的数据
-
cell-click (Function) 每次单击单元格会触发此回调,默认回调参数:row, column, cell, event
-
data-change (Function) 每次表格数据查询数据后调用
方法
-
doSearch / bindGrid (Function : void) 触发表格重新加载数据的操作
-
clearSelection (Function : void) 清除表格选中状态
-
openExport (Function : void) 打开导出 excel 的模态框
组件之间的方法调用
主传子: 通过 **$refs**
可以通过$refs 去调用组件的方法

this.$refs.ref的名字.方法名称
子传父:通过 $emit
this.$emit("tabmoved", "student-" + self.mode);

//第一个参数 tabmoved 是 组件定义的事件名,
第二个参数 "student-" + self.mode 是 事件传的参数,可以是多个参数